
 |
| Mmmmm....... |
Recently, she showed me something that blew my mind...Baked-In Apple (Apple) Pies.
Now, I'm not much for baking...other than the occasional loaf of banana/pumpkin bread, and I've never even attempted to make a pie. So in my mind, I thought that this would be the worst challenge I've faced. Honestly it wasn't that bad, and ended up being a much easier process than I had anticipated; and the payoff was completely worth it.
Here are the supplies you'll need, most of which you might already have lying around:
- 4 Granny Smith Apples
- 1/4 Cup of Sugar
- 2 Tbsp. of Brown or Dark Brown Sugar
- 1 Tsp. of Cinnamon (Adjust to taste)
- 1 box of (2) Pie Crusts
- Small Baking Dish
- Aluminum Foil
First, make sure that you preheat your oven to 375 Degrees. Take 3 of the apples and cut the tops off, and discard the tops. After this, take a spoon and carefully hollow out the apples, and discard the filling (or keep it in an air tight bowl for future use, minus the seeds and pit); be mindful that you should not pierce the skin of the apple. Once hollowed, take the fourth apple and slice it up into tiny squares to your liking, and put them into a separate bowl. Don't worry, 1 apple will be plenty to fill the three apple bowls you've made.
Next, take your remaining ingredients, and mix them together with the apples, and stir until all of the apples are coated with the mixture. Taste on of the apples, and make sure you are satisfied with the mixture, and modify accordingly, if needed. Once satisfied with your mix, spoon the coated apple squares into the apple bowls. Fill to the brim so as not to waste too much of the apple (I chose the biggest apples I could find, so this was no problem to fill up).
Lastly, take one pie crust from the box (you can find these in your grocery, usually in the cold section near biscuits and rolls), lay it flat, and cut the rounded edges off the crust into the shape of a square. Cut that square in half, and then across the cut make the remaining dough into strips. Take about 6-8 strips, and make a thatch pattern from the strips, and then lay them on top of the apples. After putting the dough on the top of your pies, make sure to flatten out the top crust on the sides of the apple, ensuring that the crust stays on and doesn't slide off during baking.
Once you've completed the above steps, it's now time to bake. Take your baking dish and fill the bottom with just a little bit of water, enough to barely cover the bottom of the pan when laying flat. This is a key step, because too much water will cause your apples to drown, and too little, and the apples will not cook through. Carefully place the apples into the baking dish, cover the dish with aluminum foil, and then into the oven to bake at 375, for about 20-25 minutes. After 20-25 minutes, remove the foil, and continue baking for another 20 minutes, or until the crust is golden brown. Remove from the oven, carefully move the apples from the baking dish onto a small plate to cool for at least 45 minutes. Afterward, enjoy!
This was a really fun thing to make, because it didn't require me to spend much on anything except apples and pie crust. I made them last night before the championship game, and my wife nearly flipped her lid when she saw that I had made them. I guess that Pinterest does come in handy for dudes, as well.
If you decide to take on this project, or any tips you have that could make it better, feel free to pitch in and let us know.
Enjoy! And as always,
Eat On.
--Justin
Next, take your remaining ingredients, and mix them together with the apples, and stir until all of the apples are coated with the mixture. Taste on of the apples, and make sure you are satisfied with the mixture, and modify accordingly, if needed. Once satisfied with your mix, spoon the coated apple squares into the apple bowls. Fill to the brim so as not to waste too much of the apple (I chose the biggest apples I could find, so this was no problem to fill up).
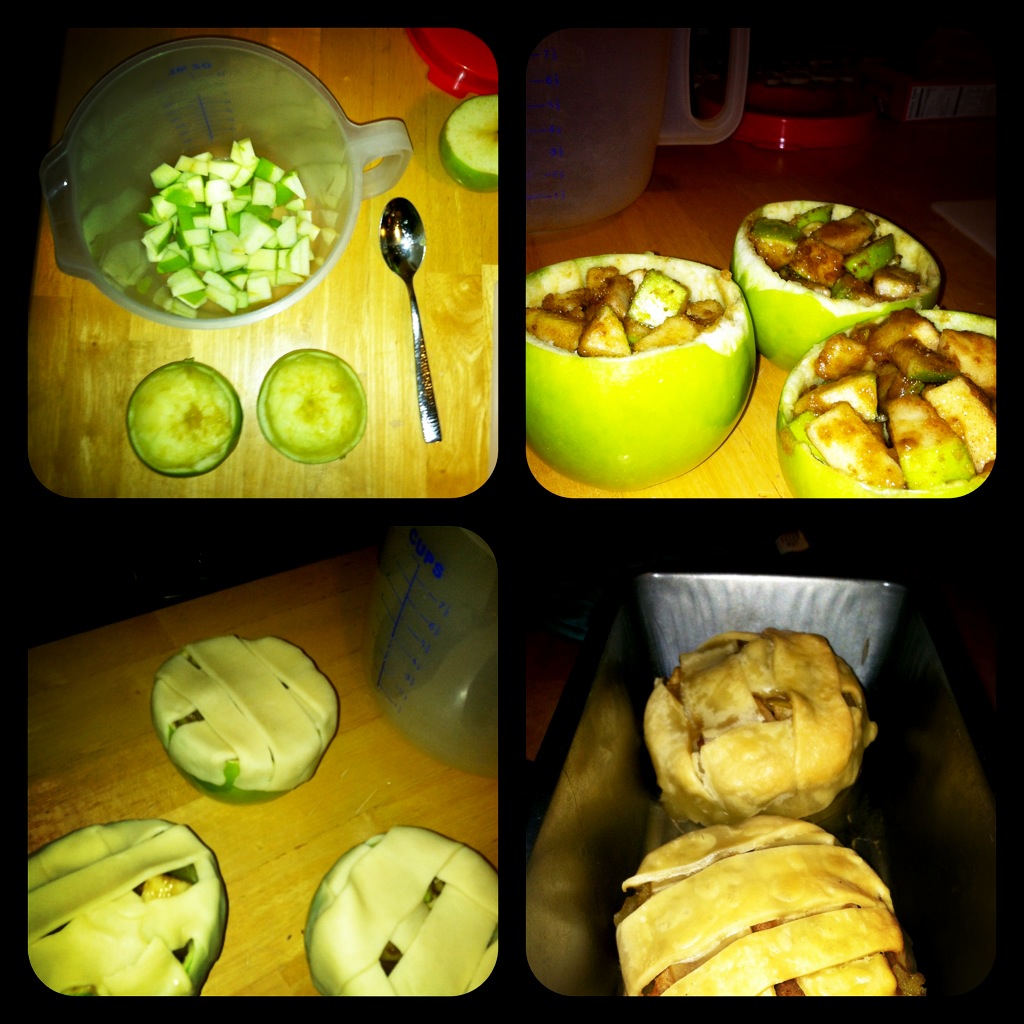 |
| The Process, Step by Step |
Once you've completed the above steps, it's now time to bake. Take your baking dish and fill the bottom with just a little bit of water, enough to barely cover the bottom of the pan when laying flat. This is a key step, because too much water will cause your apples to drown, and too little, and the apples will not cook through. Carefully place the apples into the baking dish, cover the dish with aluminum foil, and then into the oven to bake at 375, for about 20-25 minutes. After 20-25 minutes, remove the foil, and continue baking for another 20 minutes, or until the crust is golden brown. Remove from the oven, carefully move the apples from the baking dish onto a small plate to cool for at least 45 minutes. Afterward, enjoy!
This was a really fun thing to make, because it didn't require me to spend much on anything except apples and pie crust. I made them last night before the championship game, and my wife nearly flipped her lid when she saw that I had made them. I guess that Pinterest does come in handy for dudes, as well.
If you decide to take on this project, or any tips you have that could make it better, feel free to pitch in and let us know.
Enjoy! And as always,
Eat On.
--Justin
No comments:
Post a Comment